![]()
[ Page 1 ] [ Page 2 ] [ Page 3 ] [ Page 4 ] [ Page 5 ] -------- [ CRW Homepage ] [ Photos from Charlie's demo ]
Other options: I enjoy using a "Skewchigouge" sometimes instead of the regular gouge because I can remove wood fast without worrying too much about catches. I also have purchased the "Termite Tool" which does an excellent job cutting endgrain wood. The "Termite Tool" has a ring shaped cutting tip, so I find it best for hollowing and then used the square nosed scraper to finish cut the sides and bottom.
Sandpaper: The smoothness of your final cut with your lathe tool determines the grit size of you sandpaper. If your final cut is fairly rough, you may want to start with 80 grit and then progress up using 100, 150, 220 or 240. I will also sometimes burnish the outside of the box with a stick.
Finish: Here is a subject that is forever changing. I'm always experimenting with this type of finish or that type of finish. Some people like dull finishes and some like glossy finishes. Most of the time though, I will use a wiping varnish (you can make this yourself by just thinning out regular polyurethane varnish 50/50) followed by a couple of coats of a high quality furniture wax. I sometimes use a lacquer based finish.
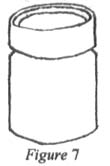
Step 1: Decide on the shape of the box you will turn. Sometimes I will sketch a profile shape on a piece of paper first. That gives me a general design to follow. But most of the time I just start turning the wood and shape as I go. I try not to get hung up to much on precision and trying to be exact because that tends to take the fun out of turning for me. I prefer freeform turning.
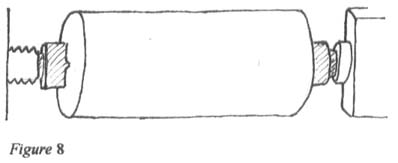
Step 2: Find the centers on each end of your piece of wood and mount the wood onto your woodlathe between the drive spur and the tail center. Turn the wood into a cylinder using a gouge or a skew.
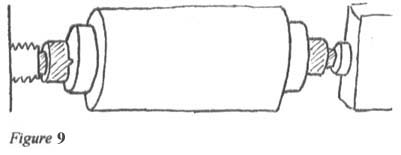
Step 3: Turn at least a 1/4" long tenon on each end of the cylinder to accommodate the later used of a chuck. Your 1/8" parting tool does a good job here. Be sure to keep the shoulders of the tenon nice and square to give a real good strong fit to the chuck.
[ Page 1 ] [ Page 2 ] [ Page 3 ] [ Page 4 ] [ Page 5 ] -------- [ CRW Homepage ] [ Photos from Charlie's demo ]
This site developed and maintained by Ken Grunke ~ Text and graphics by Charlie Cadenhead, © January 2002